
Self Directed Project has been a learning curve for me. I began this unit by thinking about what I wanted to achieve through the course of it and how this would help to further my studies.
Firstly I chose to work individually. This meant I could direct my studies in the areas that concentrate most on my own personal and professional aspirations. It helped me to develop my ability to work independently by not relying on others, solving problems by myself and ultimately developing my skills through autonomous learning. This was an important step for me to achieve as I have not worked entirely independently before and, having taken this step, I feel my self belief and confidence in my own ability has grown, which will undoubtedly aid me in my future career.
I also wanted to use this unit to broaden my knowledge of period costume. I used both primary and secondary research from a range of sources and by focussing on a specific era in time I was able to research it thoroughly to understand the silhouette of the time and become fluent with the clean lines. I have learnt about fabrics used, how they were dyed using plant dyes, how different colours demonstrated status and wealth, popular accessories and the appropriateness and etiquette of wearing what and when. I feel I used this research well to inform my work and directly influence my design, so that not only do I have a more comprehensive idea of the context, but was able to make an costume fairly accurate to the fashion of the early 1800s.
I decided to approach my Self Directed Project from a theatrical perspective, as I felt this would be most useful in aiming for a career in theatre. I looked at a variety of costumes from productions set in the early 1800s, which helped me to see how a period garment can be translated in to a costume. They influenced my considerations to theatrical use, such as using fabrics which were similar to those used at the time but perhaps more hard wearing and cheaper, so that they could be replaced once worn out, using snap fastenings for ease in case of quick changes and embroidery that doesn't need to show anything other than the impression of embroidery from the distance of the audience. I feel that, from looking at it from a theatrical perspective, I have become accustomed to thinking in this way. This helped me to create a costume, rather than a garment, and will continue to aid my future projects.
This unit has enabled me to develop my making skills. I wanted to improve on and build my confidence in using the method of pattern cutting on the stand, a skill I had learnt but not yet used to produce a costume. I feel I achieved this and was surprised at how comfortable I felt using this method. I believe I now understand more the shaping of garments to the body form and how construction lines can be manipulated to result in a better fit. My fittings demonstrated this in having minimal alterations and where there were alterations to be made it enabled me to understand more clearly how, even with accurate measurements, the slight differences in each body shape affect the shaping of the pattern pieces. The obvious improved fit increased my confidence in using stand cutting shows my progression.
The emphasis on my work in this unit was to refine my finishing skills to produce a well made period costume. I achieved this by carefully considering the techniques that would be most suitable to the fabrics I used and the theatrical context. I used a rolled seam on the edges and hem of the muslin for a neater finish. I reduced the length of the stitches to hold the fine muslin more securely and so that the stitching on the waistband would not be too noticeable. I used piped seams round the neckline and sleeve armholes for neatness in a sharper, more definite edge and to reflect the costumes I had looked at in my primary research. The fastenings are securely sewn on for constant use and the hem is rolled and machine stitched, as the costumes in my primary research were, as it is not noticeable from a distance, is more hard wearing and would be easier to repair if damaged. The accessories I have made to compliment the dress – the bonnet, reticule and parasol – were made as accurately as possible according to my research, with the correct trimmings used at the time. I feel that they help to complete the costume as a whole.
Through my Self Directed Project I have achieved what I set out in my Learning Agreement. I expanded my knowledge of period costume, became more used to approaching things from a theatrical perspective, developed and become more confident in using making skills, refined my finishing techniques and produced a well made complete costume through working independently.
Sunday, 16 May 2010
Saturday, 15 May 2010


Reflection 3: Finishing
I carefully considered the best techniques to finish the costume. I used a rolled seam for the muslin and hem, adjusted my stitch size and used piped seams round the neckline and armholes for a more definite edge.
When embroidering I made samples first to see which stitch would work best with the fabric. The fine muslin pulled and made holes with the embroidery but when looking at it from a distance the pattern made gave a better impression of embroidery, which was what I had discovered from my research too.
I used different finishing techniques appropriate to the fabric and to the theatrical perspective and believe I have achieved a neat finish and created a well made costume. With the accessories I have made I can really see how they complete the costume as a whole.
Wednesday, 12 May 2010
Reticule
I made a small reticule for the costume as most ladies would not be without one. It is decorated with beading and in a shape popular in the early 1800s with long ribbon handles.


Monday, 10 May 2010
Parasol
For the parasol I bought an umbrella and some doilies. I cut them to shape, sewed them to the frame of the umbrella and trimmed with lace.


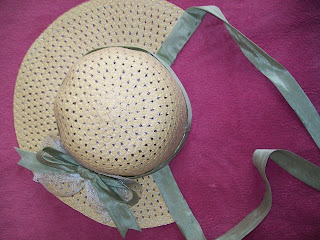
Bonnet
I shaped a straw hat in to a bonnet, made ribbon out of the same fabric as the dress and a bow for decoration. The ribbons tie under the chin as they did at the time.


Wednesday, 5 May 2010


Friday, 30 April 2010
Top Fabric Fitting
Fitting Notes:
1. Lower neckline
2. Take back in at the top slightly
3. Lower hemline slightly
4. Try to find a finer muslin to show colour of underdress


I think this was a successful fitting with only minor changes to make. Overall the fit was very good and I was very pleased with it.
1. Lower neckline
2. Take back in at the top slightly
3. Lower hemline slightly
4. Try to find a finer muslin to show colour of underdress


I think this was a successful fitting with only minor changes to make. Overall the fit was very good and I was very pleased with it.
Tuesday, 27 April 2010
Reflection 2: Research
My research has been key to this unit. The decisions I have made throughout the project have been informed by my research and it has given me a better idea of the context and more thorough knowledge of fashion in this period in time.
It has taught me more about the correct silhouette of the time, fabrics used and how they were dyed, etiquette of colour and how status is demonstrated, and popular accessories.
Looking at the costumes has helped me to see how a period garment can be translated in to a costume and therefore how to create one from a theatrical perspective, with consideration to constant wear, budget and ease of wear.
I believe that my improved understanding and now broader knowledge is enabling me to create a more accurate costume and will aid me in my future career.
Saturday, 24 April 2010
Jane Austen's House
Despite several attempts to arrange to see some garments at Winchester Museum, I was unable to. Instead I visited Jane Austen's House at Chawton and I was able to look at some of the costumes worn in the 2009 BBC dramatisation of Austen's Emma.
I found this incredibly useful as I was able to look at how the costumes had been made from a theatrical point of view, for example, the fastenings at the back were poppers for ease. The style of the costumes also gave me some ideas as to the design of the top layer of muslin, with embroidery and lace edging.


I found this incredibly useful as I was able to look at how the costumes had been made from a theatrical point of view, for example, the fastenings at the back were poppers for ease. The style of the costumes also gave me some ideas as to the design of the top layer of muslin, with embroidery and lace edging.


Friday, 23 April 2010
Reflection 1: Shape and Fit
Cutting the pattern on the stand was an important part of this unit for me, as I have not yet used this method to produce a costume. Doing it has helped me to understand the shaping of garments to the body more and I think my first fitting showed how, for me, it can result in a better fitting garment to begin with.
I thought my toile fitting was successful and I believe that using a body form all the way along helped me to then see which alterations needed to be made for an improved fit to my model. I was able to do this independently and my confidence in using stand cutting has improved and marks my progression.
I thought my toile fitting was successful and I believe that using a body form all the way along helped me to then see which alterations needed to be made for an improved fit to my model. I was able to do this independently and my confidence in using stand cutting has improved and marks my progression.
Wednesday, 21 April 2010
Blog Tutorial
I had my blog tutorial with Graham today and we looked at the progression of my blog. The suggestions made on how to improve it were:
1. Be more reflective in my posts about myself and my progression.
2. Possibly make separate posts focused entirely on reflection.
3. Note how I have used my research in my work and how each step informs the next.
4. Sign up for a tutorial for my next fitting.
I think these are good suggestions and can see how they will improve my blog and work so I will follow them all up.
Friday, 16 April 2010
Fabrics
For my fabric choices I wanted to stay quite close to what would have been used at the time, but also a fabric that would be suitable for a theatrical costume.
For the main fabric I have chosen a polyester/silk blend. This is not as expensive as the pure silk, so it can be cheaply replaced when worn out.
The top fabric is a thin muslin, which would have been used in garments of the time.
The evening dresses of wealthier people were usually white, however I have gone for sage green for the main fabric with white muslin over the top, as plain white costumes do not react well under stage lighting from the audience's perspective.
Toile Fitting
Fitting Notes:
Take shoulder seams in at edge,
Take side seams in,
Bring waistline up,
Take darts in at new waistline,
Take hem up.


I'm really pleased with this fitting. The toile fitted well and only needed taking in a little. The overall shaping to the body was good, which I believe to be a result of cutting the pattern on the stand.
Subscribe to:
Comments (Atom)